I had a hard time deciding on my number 1 favorite remodel so in honor of today's closing (fingers crossed!) of this little beauty it only seems fitting to post this today. Be forewarned, this is a long post. ;)
This was my biggest remodel undertaking yet - of all the projects I'd done, I had yet to knock down a wall. This kitchen had everything BUT an open concept. Normally I wouldn't want to alter a 140+ year old house this much but enough remodels had taken place prior that I felt that doing so would bring back some of the charm I knew she had.
The couple that owned 10th & Wash prior to me lived in and loved this house for nearly 30 years. He was a meticulous carpenter and had built custom cabinets throughout the house - even roll out drawers which was unheard of for a house this old. I never had the pleasure of meeting them but in my mind they were a cute little couple that loved entertaining in this home - and I picture her being on the petite side since one of the counters was about 3" shorter than the stove it surrounded.
My first observation was that there was no dishwasher - having lived without one for many years I knew I could hang but also knew I didn't want to. Luckily this would be easy to add. The next observation was that while furnished as an eat-in kitchen, the four-person table was tight and since the home had a large dining room, the eat-in part wasn't necessary. Taking out the table made the space big - too big. I know that sounds crazy to say but hear me out. Inefficiencies are created with too much space in between kitchen counters. The easy road would've been to add an island but that didn't solve my desire to create an open floor plan.
The wall with the stove and the short counters would need to go. Since this house had storage oozing from every corner I could easily remove the upper cabinets and still sleep at night. But I needed the lower cabinets. It wasn't even a budget consideration, these cabinets were too good to throw out. By scooting the base cabinets 15" in to the kitchen I would close the awkward gap in the kitchen and extend the counter to a bar. This maximized the space of the kitchen and added
back in the eat-in element to the kitchen all without decreasing the square footage of the adjoining dining room.
The only issue left was the counter top height. Thankfully I have an incredible contractor that also happens to be a fabulous cabinet maker. He would add a small drawer above each cabinet adding both functionality and height to the counters. Perfect.
I mentioned the kitchen was next to the dining room - which in most cases makes perfect sense. Except I wanted to be able to entertain from the new kitchen into the living room. Both living and dining room were similar in size and next to each other so this would be an easy swap. Except for the built in buffet in the old dining room. Like I said this house oozed storage and as much as it pained me to rip out the gorgeous built in cabinets - it was the right thing to do.
So here was the list:
1. Install dishwasher in base cabinets near sink
2. Remove old counters and back splash
 |
| Dad came over to help me remove the old counters and install the new. We had a race to see who's technique would work faster... as you can see I am NOT in the photo because I won. ;) |
3. Remove upper cabinets on the stove wall
This was actually the first thing I did. I turned my annual Christmas party into a house warming party (the day after I closed!) which after a few glasses of wine turned into a demo party. Free labor - why not?!
 |
| You don't demo in a dress and heels with a glass of bubbly? Amateur. |
4. Knock down the stove wall
 |
| I wasted no time in knocking that puppy down. |
 |
| View of the wall coming down from the new living room. |
 |
| The addition of a multi tool with a drywall blade made all the difference. This is where I stopped, leaving the licensed professional to take over. |
 |
| Sweet Lucy was very patient during the remodels. The blue tape outlines where the counters and stove will be moved to. |
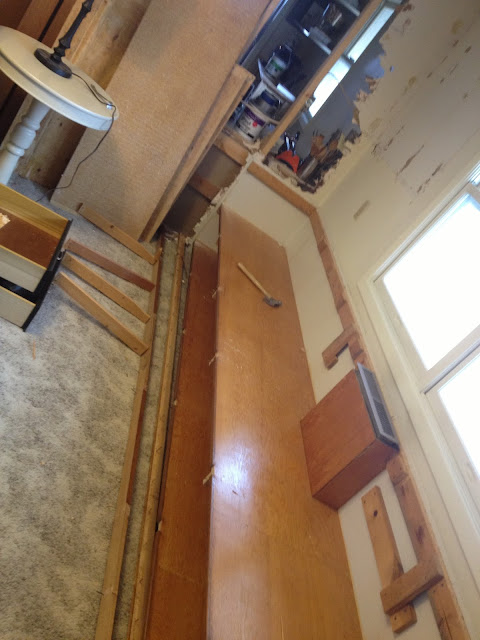
5. Move stove base cabinets into the kitchen 15", build up to correct height
 |
| There was a lot of take out for Sweet Lucy and I... this blue line indicates where the counters will come up to. |
 |
| This was after the counter was moved in, looking in from the new dining room. |
 |
| View from the kitchen, counters have been moved 15" in and the framework for the new drawers is complete. |
6. Install butcher block counters on back wall with new sink and faucet
 |
| I am so thankful for a handy Dad! Installing two butcher block counters at a 90 degree then adding a sink in the corner was quite the challenge, We got tips here. |
 |
| This was a risky cut. If we messed up we'd need a new piece of butcher block and IKEA is a loooong ways away. Thanks to Dad for having a steady hand and the right tools! |
 |
| I have THE best girlfriends ever. Jen stopped by during the counter top install with champagne. Love Love. |
 |
| Thanks Dad! |
 |
| Beautiful!!! Since I stained the butcher block at Mulberry Forest I decided to leave this one in her birthday suit and just add olive oil as needed. I LOVE them! |
7. Extend soffit over over new fridge and build wine rack
 |
| Thanks to my Step Dad for building this custom wine rack above the fridge! |
8. Install counters on the new peninsula and eat-at bar, using Habitat post
 |
| Truth be told I bought the post at Habitat before I even knew this little house existed and it drove the concept for the peninsula. |
9. Remove dining room built in buffet
 |
| Before and during. |
 |
| Taking down the uppers made the room feel HUGE! |
 |
| I snapped this picture to show how crafty the previous owner rally was. That vent WAS on the floor until he built a custom vent to come to the top of the counters. |
 |
| Like I said earlier, I have THE best girlfriends ever. I would still be ripping these out had Miss Ashley not helped - thank you! |
 |
| Clean up... My favorite part... |
10. Add decorative beams between living room and kitchen
 |
| My contractor installed new support beams when the wall was removed. Since this was one of many remodels over the years the ceiling heights were different so a decorative beam was needed to connect the two. |
 |
| By this point Tommy Thompson and I had started dating and I rummaged through the barn wood pile at My Lakehouse for the perfect rustic FREE wood beams. |
11. Install tile back splash
 |
| Tommy Thompson running the wet saw. |
 |
| I actually installed this tile MYSELF!!! The picture above was taken about 2 months after this one when Tommy Thompson came over the help me with the awkward cuts. |
12. Install wood continuous wood flooring from dining room through the kitchen
13. Paint sink wall cabinets white, peninsula cabinets black
14. Install new light fixtures
15. Add a free-standing counter and open shelving to the right of the mud room door
 |
| The counter was a fab IKEA find and the open shelf was more barn wood from My Lakehouse. |
I.Love.This.House. Don't get me wrong my Lakehouse is home and I love it but this house is special. After remodeling Mulberry Forest I was eager to step up my projects and take on more, learn more, have a bigger to-do list and boy did I get it. This house is probably one of the neatest homes I've ever seen - from the crawl space (I'll post that later) to the custom woodwork, quintessential front porch, insane closets and the finished product - this is a home I will not soon forget. I bought this house expecting to live here for a long time, hopefully meet a man to spend my life with and share with him. Thankfully I met the man of my dreams (now my husband!!) while living here and he and I were able to work on projects in this little space together. Moving in to my Lakehouse with him has been the most amazing thing ever and if I could take this little gal with me I would in a heartbeat. My wish is for this home to bring years of happiness and memories to the new owners and that they fall in love with all her little intricacies and charm just as did.
As with Mulberry Forest and well, life, I could not have done any of this without my friends and AMAZING three parents. And a big thanks to my realtor,
Ryan, for helping me find and buy and subsequently sell this perfect little home. Seriously, he's the best - if you need a realtor - call him! And while we're at it - THE BEST mortgage team around, the
Francis Team. Thanks!!
Here are a few (ok a lot) more before and after pictures...
 |
| Before - Living Room |
 |
| After - Now the Dining Room |
 |
| Before - Kitchen |
 |
| After - Kitchen and Living room |
 |
| Before - Kitchen |
 |
| After - Kitchen I still cannot believe the transformation!! |
 |
Before - Kitchen
 |
| After - Kitchen |
|
 |
| Before - Hallway bathroom |
 |
| After - Hallway bathroom |
 |
After - Spare bedroom and a sweet puppy
 |
| Before - Master bedroom |
|
 |
After - Master bedroom
 |
 |
After - Master bedroom shoe closet
 |
| Before - Master bathroom |
|
 |
| After - Master bathroom |
 |
| Before - Mud room |


No comments:
Post a Comment